How to improve sharpness
By Lars Kjellberg
But how do you improve sharpness with out spending a lot of money? What is depth-of-field? Is sharpness improved when I stop down the lens? What's the difference between sharpness and contrast? The questions are many and complicated. In this series of articles we will clear some of these questions up, disperse of the fog and then maybe you'll see it more clearly in the future.
Depth-of-field versus total sharpness
We received a letter with a question about sharpness and depth-of-field. I had, in an article about Sinar's computer controlled large format camera Sinar E, written that thanks to the computer support it was now possible to photograph a three-dimensional object with full depth-of-field, without having to stop down as much as when using the manual setting. This limited stop-down results in improved sharpness. The writer of the letter asked how this was possible. "If the depth-of-field increases, doesn't the total sharpness increase?"
We are talking about two elemets working together: depth-of-field and sharpness in the plane of focus.
Never perfectly sharp
A photograph is never perfectly sharp. The reproduction that is made with an optical system is never perfect. The question is, how can it be improved? Optimum sharpness is achieved in the set plane of focus. Behind and in front of this plane the sharpness isn't as good. This is where depth-of-field comes in, and "depth-of-field sharpness" is not as sharp as the sharpness in the plane of focus. In depth-of-field, you first of all decide just how unsharp a point is allowed to be and then you calculate within what distance from the plane of focus this unsharpness stays tolerable. Allowed unsharpness varies with different film formats. A 35mm negative has to be sharper than a 6x6 negative, becuase the 35 mm negative has to be enlarged more than the 6x6. In another article we will address depth-of-field questions, how it's defined and calculated.
Sharpness in the plane of focus
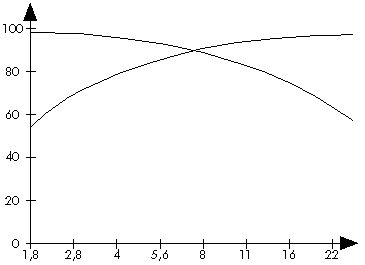
Normally a lens is at its sharpest at aperture 8, as principally illustrated in the diagram below.
A lens improves optically when stopped down. At large apertures most of the glass in the lens is used, resulting in a slight blur caused by unavoidable imperfections in the lenses. When stopping down you screen off parts of the lens and use only the central area of it. The optical picture is more correct and the resolution improves. The ascending curve, starting at 40, symbolizes this "optical" and theoretical sharpness. Reality, on the other hand, is not quite as simple. A phenomenon called diffraction makes a mess of things!
Diffraction
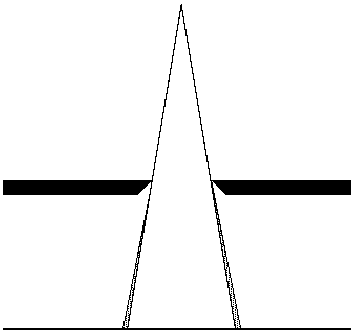
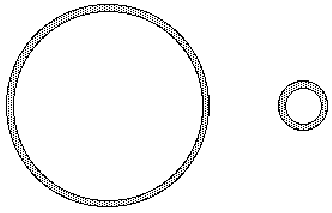
In the middle ages an Italian scientist discovered that light doesn't always behave like we expect it to. In his experiments he let light from a dot-shaped source of light pass through a round hole with sharp edges and hit a white surface. Geometrical rules make it easy to calculate how big the circle of light appearing on the white surface will be. The Italian's problem was that in real life the area turned out to be larger than his calculations and that the edges became fuzzy. Light seemed to turn off when it hit the edge. By character light moves in waves. When a wave passes an edge, it turns slightly. It's called diffraction. The diameter if the light passing a lens is limited by the diameter of the aperture. The aperture forms a sharp edge and the light closest to the edges turns off slightly. The edges of the aperture cause a certain fuzziness.

But diffraction does not give the pictures a fuzzy edge as you might expect. A light beam is at its largest when it passes the aperture and diffraction arises. After that the light beam breaks into a more or less sharp point. The fuzzy diffraction light is also a part of this point.
It's only the light passing closest to the aperture edge that turns off and becomes fuzzy, so when you are using a wider aperture the percentage of light that is fuzzy decreases. Small holes result in a lot of diffraction. A mathematical talent can easily understand that. Regardless of how well-constructed, well-built and lavished a lens is, it's never better than the limits of diffraction allows it to be.

Best at aperture 8

In the diagram above with the two curves, the descending curve symbolizes diffraction. At wide apertures the diffraction is minimal. The part of the light beam that turns fuzzy is very small. But when you stop down and the hole gets smaller the diffraction gets worse. At aperture 0 (a practical impossibility) the diffraction is 0 and the sharpness is 100 %. At aperture 64 resolution is very limited by the diffraction. At 20 line couples/mm (more about this later) the contrast is only 16% of the original. Sharpness is therefore limited not just by imperfections in the lens but also by diffraction. In the middle of the diagram, at aperture 8, sharpness is at its best. Then it gradually gets worse again.
Practical exercises
We were curious to see if the theoretical calculations would be correct put into practice. We took a series of shots at different apertures. We used our EOS100 with self-timer and pre-released mirror, mounted on a tripod. The 50/1,8 lens was focused using the cameras superb auto-focus. The patterns with black and white lines were photographed placed in the middle of the picture. All were developed simultaneously and the negatives were photographed through a microscope. These are the results.
We knew there would be differences, but we didn't know they were going to be as significant they turned out to be. This test shows that aperture 8 is the best, followed by 5,6 and 11. 1,8 is approximately as bad as aperture 22. 16 is better than 2,8.
Please keep in mind that this test only shows sharpness in the plane of focus. Objects outside of this plane are of course much sharper at 22 than 1,8, because the depth-of-field is considerably bigger with the smaller aperture.

Add your message
Please login here or if you've not registered, you can register here. Registering is safe, quick and free.
photodo Stats
428 MTF tests
74 in-depth photodo reviews
100+ users join each day
Help the lens community by reviewing or rating a lens today via our lens search
Latest Lens Reviews
- Chinon 28mm f/2.8 Vintage Lens Review
- Canon EF 70-200mm f/4L IS II USM Lens Review
- Samyang AF 85mm f/1.4 EF Review
- Sigma 70mm f/2.8 DG Macro Art Review
- Samyang AF 24mm f/2.8 FE Review
- Meike 50mm f/1.7 Review
- Tamron 70-210mm f/4 Di VC USD Review
- Lensbaby Burnside 35mm f/2.8 Review
- Asahi Super Takumar 50mm f/1.4 Review
- Asahi Super-Multi-Coated Takumar 135mm f/3.5 Review
